Friday, September 30, 2011

Go Brewers!!!! Vinyl Decal Logos for Car


So my hubby and I are HUGE Milwaukee Brewers fans and lucky us we are going to the first NLDS Postseason game at Miller Park tomorrow. The Brewers will be taking on the Arizona Diamondbacks. I knew I had to go all out for the ride down tomorrow so I made some vinyl decals for the car. I made the Brewer Glove logo myself in Inkscape.


The MVP(s) 28/8 is for my favorite players: Prince Fielder & Ryan Braun.

GO BREWERS!!!!!!!!

Feel free to contact me for information & pricing for your own custom vinyl decals


Monday, September 26, 2011

Lukeyloo is an Artist


Lucas and I took an afternoon to become artists. We recently read a book about Big Bird from Sesame Street and in the book Big Bird makes several different kinds of art. I told Lucas he could be an artist too! I had him rip several pieces of cardstock and allowed him to place them wherever he wanted to on the white background. He then used my punches to add circles. I picked out a couple different embellishments that coordinated and he placed them on. Lastly I added the dashed lines to some edges. He taped the picture up on his wall. I love that he looks at and calls it "his Artwork". It is refreshing to see craftwork through children's eyes.... it reminds you to not take it too seriously. Just have fun creating art!

Saturday, September 17, 2011

Scrapfest Update

The long line for the Little Yellow Bicycle make and take. Its only 8:15 and it doesn't open until 9 am!


Friday, September 16, 2011

Scrapfest 2011

Let the waiting in line begin. I am attending Scrapfest 2011 at Mall of America this weekend.  Lots of line-waiting for Make and Takes. I will keep you updated on the fun all weekend!


Wednesday, September 7, 2011

Daily Junque Album


Here are some pictures of a Daily Junque album I purchased as a kit from Archiver's. The kit is from House of Three and Pink Paislee. I made this album/journal for a friend for her 30th birthday. The employee at Archiver's said it would take about 5 hours to complete -- ha, I did it in 3. This was a really fun, easy gift to make for a friend. It retails for $25 and was so worth it.


.


Saturday, September 3, 2011

Charlie Brown Canvas Art Update - Lucy Joined the Party


Hi All - Another completed piece for the Charlie Brown collection. This one features both Charlie Brown and Lucy. I changed Lucy from the original cartoon. The cartoon had her kneeling on the ground. I used a free Lucy file I got from Mardenz. She has some great files in every cartoon imaginable. One more to go.... keep tuned in! All is paper except the swoosh underneath Charlie and his shorts. Those are both black vinyl. I also added some Black "Scribbles" to Lucy's hair to add some shine and dimension.

Thursday, September 1, 2011

Throwback Challenge for Sept. 1st - My Creative Time


Here is a card I made for the Throwback Challenge Emma posted on My Creative Time on Sept. 1st. The challenge: a Cricutless Challenge to make a card using purple, orange, green, & black. I used my new "Small Talk" stamp set for the border and sentiment. The patterned paper is called "Witches Brew" from Cloud 9. The ghost was stamped and embossed in black and then cut out. I added orange to his feet and some crystal Stickles. (The ghost was a $1 stamp from Michael's!)


My Creative Time's "Small Talk" Stamp Set

I bought my first stamp set by Emma from My Creative Time and absolutely LOVE IT! The set is called "Small Talk" and features a 3" x 3" dotted border along with various phrases that fit in the blank portion of the border. The stamps work great and I found it pretty easy to line up the phrase with the border. I am now a Small Talk stamping fool! The set is extremely versatile and can be used all year long. This is a "Must Have" for card makers.


Wednesday, August 17, 2011

Mickey Mouse Picnic Table using Vinyl as Stencil


I got this toddler picnic table free, yes free from the curb that is. A neighbor had it out one afternoon and I grabbed my husband and snuck it into my car before I could face the awkwardness of a neighbor seeing me. The table was in pretty bad shape but I knew I could make it look great! Some paint and a couple nails would make it look brand new.


My son, Lucas, loves Mickey Mouse and I had been dying to try out creating vinyl stencils so I decided to do a Mickey Mouse theme. I first painted the picnic table with a primer and than glossy black, red, and yellow paints from Valspar.

I downloaded the Walt Disney font and used that for "Mickey Mouse". The profile of Mickey was a free svg file I found on the internet. I imported the file into Sure Cuts a Lot 2 to cut using the Cricut.


My only regret on the stenciling was that I didn't have the stencil down well enough. Some of the yellow and red paint bleed through. I went back later to touch up those areas.

Total cost for project: about $30 for paint and about 25 cents work of vinyl!

Friday, August 12, 2011

Birthday Card using Daily Junque set from Pink Paislee


I purchased the Daily Junque monthly kit from Archivers recently. The kit is from Pink Paislee. I made the book for a friend and used the leftovers to make her a birthday card.

Supplies Used:
Yellow patterned paper and string - Daily Junque kit (Pink Paislee exclusively at Archiver's)
Bicycle layer - Emma's Shop Collection "Accent Cuts" (Crate Paper)
Red cardstock - Simply Delightful paper pack (My Mind's Eye)
Sentiment - "It's Your Birthday" stamp set (Stampin' Up)
Embossing pad - Clear Emboss-It (Ranger)
Black Embossing Powder - Super Fine Detail Powder (Ranger)

Monday, August 8, 2011

Couch Card using Good Company svg file from Lettering Delights

I was dying to use the new Good Company svg file from Lettering Delights. At the same time, my husband needed a thank you card for a co-worker. I loved using this couch file. The yellow was cut first, with the red-polka dot and black layered on top. I had initially made a boo-boo by embossing the sentiment right onto the black cardstock. It looked really funny so I decided to punch a label out of yellow cardstock and emboss on that. The black and white ribbon helped masked my embossing mistakes too. Those mistakes actually made one darn cute card!

The first version. I tried to remove embossing marks with baby wipes - bad idea!


Supplies Used:
Couch Die-cut: Good Company svg file (Lettering Delights) Link
Patterned cardstock: Social Club (Cosmo Cricket)
Sentiment: One of a Kind set (Stampin' Up)
Red Embossing Powder: Zing Embossing Powder in Rouge (American Crafts)
Ribbon: Elements (American Crafts)
Punch: Vintage Label (McGill)
Gel Pen: White Gel Pen (Gelly Roll)

Monday, August 1, 2011

Wedding Memory Box

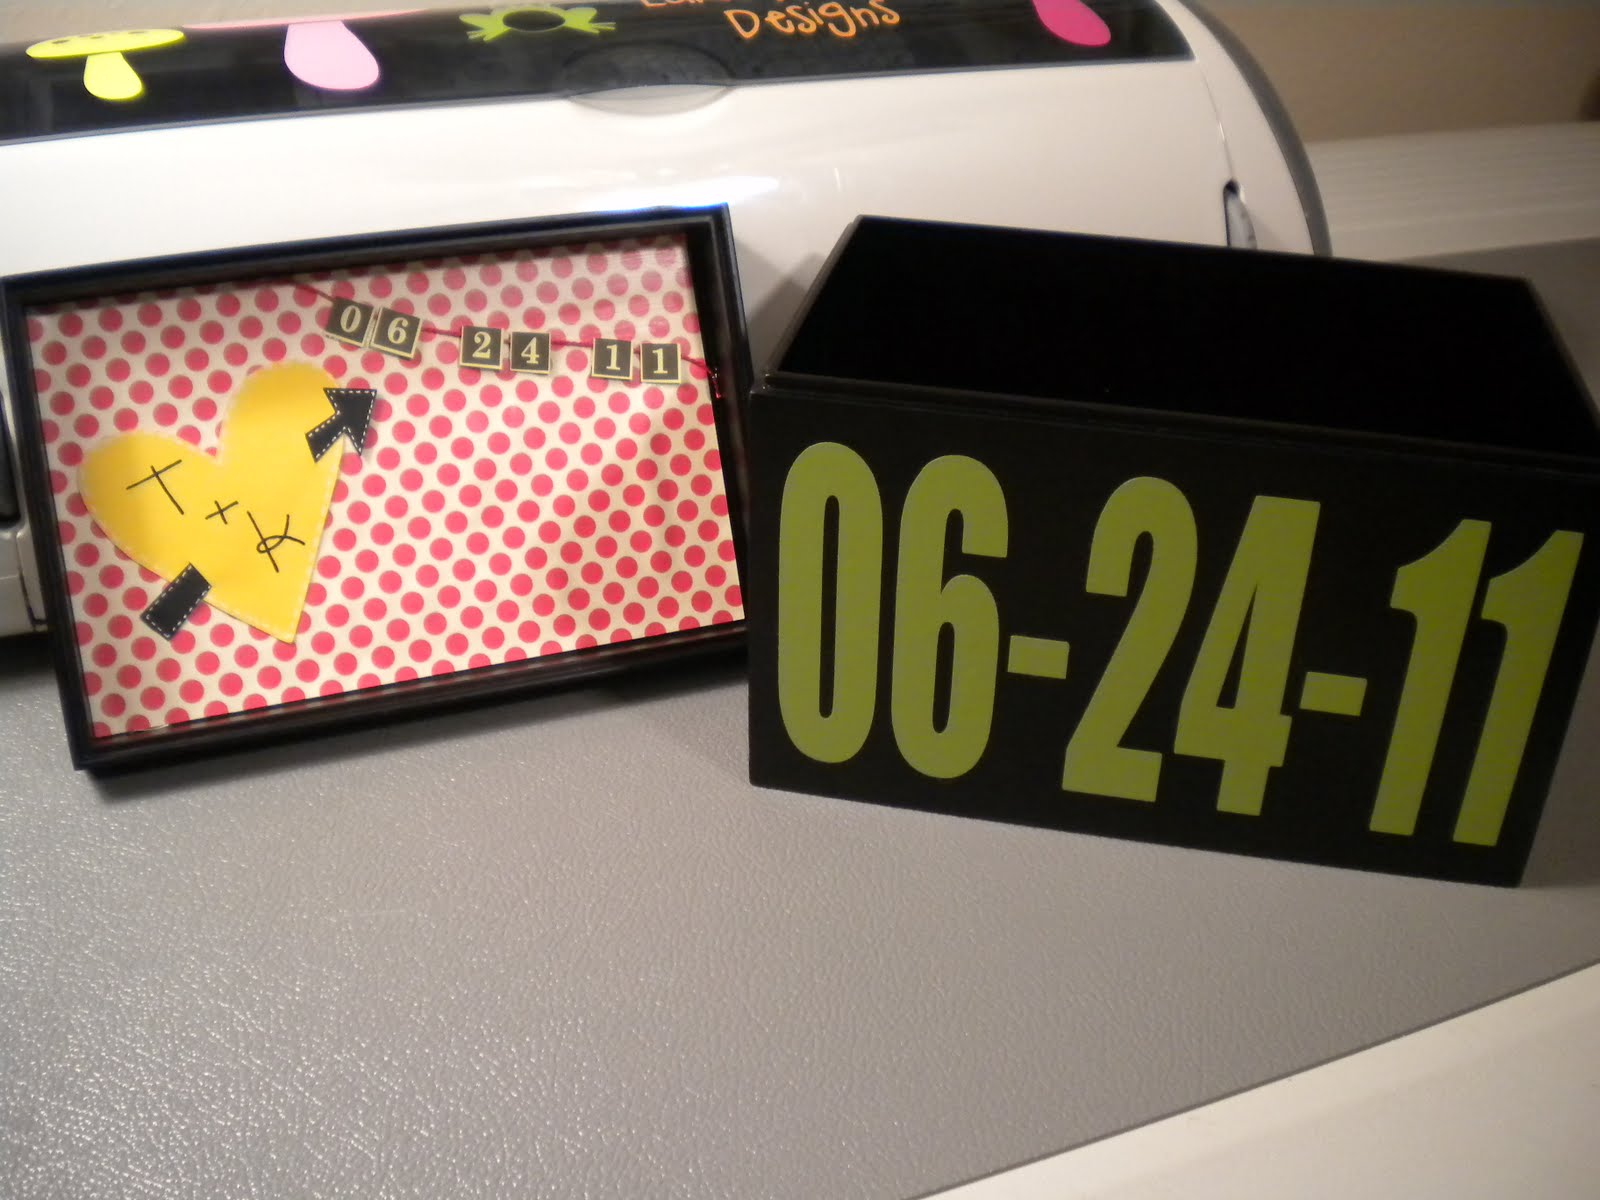
This wedding memory box is one of my absolute favorites. I initially found the plain brown box at Hobby Lobby in their 80% clearance section. I had no clue what I was going to do with it but it was too good of a deal to pass up. As my friend's wedding was approaching, I really wanted to do something more personal for her. I decided to use the box as a "memory box" for her and her new hubby to put sentimentals in like the invitation, corsages, etc.


I knew right away I wanted to do their wedding date in vinyl on the front of the box. The vinyl was cut out of Oracal 631 - Olive.


I then took Mod Podge and glued a patterned paper at the bottom of the box. I used Cosmo Cricket's Social Club Cocktail in "Now Spin Me Round". I also added the flip side of the paper (the red polka dot) to the underneath of the lid.


The lid was looking a little boring so I decided to go old school and do their initials "T+K" in an arrowed heart. The heart was cut from the "Monster Love" svg file from Lettering Delights. Click HERE to check it out on their site. Their initials were rub-ons from Doodlebug's All Mixed Up - Beetle Black large.


I also used string to make a banner that had their wedding date. The numbers were cut from Collage Press' Sunnyside Lane cardstock.


Wednesday, July 27, 2011

Simply a Card

This understated card was inspired by a design from Kristina Werner. I liked how easily it came together yet how "together" it looked. This could be for any occasion - inside I included a brown "Happy Birthday" rub-on sentiment.


Supplies Used:
Patterned brown cardstock: Simply Delightful pack - My Mind's Eye
Flower rub-on: Accent Books 2 - Mini Marks by American Crafts
Blue ribbon, blue cardstock, blue ink: own collection
Embossing Folder: Floral Fantasy - Cuttlebug


Monday, July 25, 2011

Chandelier Wedding Gift Wrapping


I LOVE Tiffany Blue and Black together. That color combination inspired this pretty package for my friend Kelly's wedding. The wrapping paper and black satin ribbon was left over from my wedding (back in 2007). The chandelier and lettering was done in black vinyl. I find the vinyl much easier to apply than paper, especially for lettering.

The font I used for their names was CK Ali from Ali Edwards.
This free font can be downloaded HERE


Click HERE for a link to the "The Free SVG Blog" where I got the Chandelier SVG file I used. The exact one is no longer on there (boo!) but there is another one.

Saturday, July 23, 2011

Bicycle Travel Card made with $1 stamps


I had so much fun making this card and, believe it or not, all the stamps used are from the dollar spot at Joann Fabrics. Sometimes I get cheapo stamps and then don't stamp evenly. These though work absolutely perfectly. I first stamped the bicycle in alternating lines on kraft cardstock. I also distressed with black ink. I taped the cardstock down on a brown A2 card. Next I stamped the sentiment in brown ink on cream cardstock. I embossed with clear embossing powder.


The ribbon is the same ribbon that I used on the "One of a Kind" couch card. The black and white didn't quite fit with this feel so I rubbed the black ink on the ribbon to give it a more vintage feel. I finished with a antique brass brad.

Supplies Used:
Bicycle Stamp: Summer Mini Assortment (Studio 112)
Sentiment: Summer Mini Assortment (Studio 112) -- this also comes with a great hot air balloon
Black ink: Cat's Eye Pigment ink
Brad: Antique Brads (The Paper Studio)
Ribbon: Elements (American Crafts)


Thursday, July 21, 2011

Card for My Hubby using Tim Holtz's Brick Embossing Folder

I made this card from sweet hubby, Steve. To be honest, I usually don't make him cards. This weekend though he is doing this obstacle course race with his brothers called the "Toughest Mudder." Since I can't be there I thought I would send him off with some inspiring sentiment. Plus it gave me a reason to use my new brick embossing folder from Tim Holtz! I really like how all the colors play off each other and have a masculine feel.

Supplies Used:
Patterned cardstock: Vintage Newspaper (The Paper Studio)
Embossing Folder: Brick (Tim Holtz Alterations for Sizzix)
Sentiment: One of Kind set (Stampin' Up)
Black distressing ink: Cat's Eye
Punch: Vintage Label (McGill)
White Pen: Gelly Roll

Tuesday, July 19, 2011

Create with your Kids - Amelie's Accessories

My friend Christy and her daughter Maddy came over to scrapbook and we decided to try out my new kit from SVGcuts called Amelie's Accessories. Christy made the purse and Maddy made the Eiffel tower box. We used the Amy Butler's Lotus Tea Box paper pack for both.


Just the girls!

We loved making girly things!

Saturday, July 16, 2011

"Pocketful of Sunshine" card

Sorry for the blurry picture - YUCK!

The idea for this card came from Natasha Bedingfield's song "Pocketful of Sunshine". Initially I was going to make the pocket look more "jean-like" but the patterned paper screamed for some bright blue. I free-handed the pocket's flaps by using the Martha Stewart scoring board and attached using double-sided red tape.

The sentiment was cut using the Cricut and Sure Cuts a Lot 2. I cut the words out of pink vinyl. I used the negative part of the vinyl on the top and the letters for "Sunshine" on the pocket.

The sun was attached with some yellow rick-rack and sits inside the pocket for a little surprise. The file is from Lettering Delights Banner Day svg file. I first cut it in orange cardstock and than yellow. I also white-line dashed it and added a yellow button to the middle.


Supplies Used:
Patterned paper and flower border: Sweet Summertime paper pack (Echo Park)
Sun svg file: Banner Day (Lettering Delights)
Jewels, Rick-Rack, and Button: personal collection
Dash-line: White Pen (Gelly Roll)
Vinyl: Lipstick (Oracal 361)

The Banner Day file is free when you create an account with Lettering Delights. Please click on their ad from my site to sign up and get this great, FREE file!