Monday, October 31, 2016

DIY Baby Nursery Canvas Art Under $10


I love making custom pieces for my customers and this nursery canvas is no exception. Check out below the picture for all the details and instruction.


Supplies: 
  • 12x12 thin canvas (from Hobby Lobby)
  • blue acrylic paint
  • black vinyl
  • blue vinyl
  • small mini metal clips (like these from Staples)
  • Cutting machine such as a Cricut
Instructions:
  1. Paint the canvas your desired color. We used a light blue.
  2. Type your quote into your Cricut or use software like Sure Cuts a Lot.
  3. Cut your vinyl.  I chose to put the baby's name and a few letters (the L and H) from the quote in blue and the rest in black.
  4. Adhere vinyl to canvas after paint has dried completely.  Leave about 6" in between quote and baby's name to put photo
  5. Using a basic glue, adhere the mini clip to the canvas
  6. Clip picture
This canvas art piece can be stood on a shelf or hung onto the wall using velcro or 3M tape.  I also love that the picture can be changed out as often as you'd like.  A great project for under $10!

Monday, October 10, 2016

Newest Addition - Baby Girl Scrapbook Page Layout

I love this page featuring our little Miss Aubrey.  It was created using the Echo Park "Bundle of Joy" 12x12 Collection.  Love this pack!


Happy scrapping!

Thursday, October 6, 2016

FREE Scrapbook Planner Worksheet

Like to scrapbook but having a hard time keeping it all organized?  I created a editable, printable scrapbook planner worksheet just for YOU!


Here are some tips on how to use it:
  • Print a separate page for each topic. I do years as well as individual children
  • Use pencil only - that way you can erase and change as needed
  • Write the activity, event, or memory you want to scrapbook about
  • Post the date(s) of the event
  • Put an "x" or checkmark on whether you have printed the photos for the event
  • Go through your digital images or physical photos of the event and write down how many pictures they are as well as their orientation and sizes (for example 2 v 3 h 1 5x7 means I have two vertical 4x6's, three horizontal 4x6's and one 5x7)
  • Estimate the number of pages you will need for they layout - use your number of photos as a guide
  • Put an "x" or checkmark if you have started the layout
  • Put an "x" or checkmark if you have finished the layout
Download your planner here today! Happy Scrapbooking!

Monday, October 3, 2016

DIY Zig-Zag Corkboard

Here is a quick and inexpensive corkboard you can make at home!  It is super easy to make and pretty much anyone can do it! I promise.
Here's how to make your own:

Step 1: Start with the right supplies: (4) corkboard squares (purchase here from Target), blue painters tape, paint brush, ruler, adhesive square to hang, and any type of craft paint  or spray paint.


Step 2. Layout your squares.  Using a pencil and ruler, draw 1" diagonal lines starting with the center ones first.  I made the middle line slightly larger.


Step 3: Place painters tape on the areas you want to remain corkboard. The exposed areas will be painted.

Step 4: Spray paint the corkboards and allow to dry.  Once dry, peel off the tape.


Step 5: Hand corkboard using adhesive squares.  I used small ones and they didn't hold very well. I would suggest a medium-grade adhesive for better results and a lasting look.

Wednesday, September 14, 2016

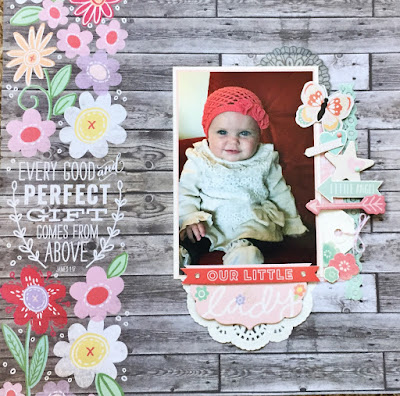
Baby Girl Scrapbook Page Layout - Our Little Lady

Every have one of those pages you are just super proud of? Those layouts where everything seems to work from the paper to the photo to the embellishments?  Those pages that make you feel like a scrapbooking rock star? Well, for me, this is one of those pages.

This is one of the view layouts of my sweet little Aubrey (I'll catch up someday).  She was around nine months at the time.

The 12x12 kit I used was "Sweet Baby Girl" by Me & My Big Ideas. I love their kits because they include lots of high quality pieces to mix and match.  It's on sale at Walmart here.

Happy Scrapbooking and see you soon!

Our Little Lady Scrapbook Layout

Wednesday, September 7, 2016

Party Planning Series 02 - Party Like an Angry Bird

Do you remember when Angry Birds were cool?  If you ask my seven year old, he still thinks they are!  He loved them... was obsessed with them.... couldn't get enough of them.

It even became the theme for his fourth birthday party.  We had a great time planning and he had a great time partying.  Here are some highlights from his Angry Bird party:

The invitations for this party were fun to make.  I used the Cricut and an Angry Bird SVG file to cut the red bird.  The cloud and wood piece were also cut with the Cricut.  I used a woodgrain embossing folder on the wood and a swirl on the cloud. (*tip - When dry embossing, you can usually run three pieces of paper through the Big Shot at a time)  I used a real rubberband for the slingshot.  Inside the invitation I put all the party details.


The thank-you cards were kept pretty simply.  I printed the green pig on white cardstock.  I used the Cricut to cut the golden egg and added a heart stamp which I colored in red.  A black Sharpie was used to freehand the accents.


LOVE the inside of the thank-you card!


For my kids birthday parties, I tend to use a lot of their toys as decorations.  Here I took one of Lucas' large plush Angry Birds and put in a basket (nest) with some filler.  Super cute and free!


My sister, Emily, made an awesome King Pig cake complete with crown.  I wish I had a before picture!


 I made an "Angry Bird Creation Station" complete with coloring books, stickers, tattoos and other fun craft supplies.


And of course no birthday would be complete without an Angry Bird bike!


Thursday, September 1, 2016

Party Planning Series 01 - A Scooby Doo Birthday Party

I thought I would start the Party Planning Party series off easy with my son Lucas' Scooby Doo themed third birthday party.  Typically I go all out for these kinds of parties, but for this one I kept it simple.

Scooby Doo has always been a favorite of his.  The classic cartoon episodes, the characters, the Halloween costumes... we've done it all.  This party has three main elements to share: the balloons, the cake and the invitation.


The Balloons

Balloons are easy but expensive.  I try to use them when I don't a lot of time to prepare my own decor.  I also used a pre-bought banner for this party too (eek! I never do that!).  I typically go to Party City for the balloon bouquets when I have a specific theme.  The Dollar Tree has great options when going a little more generic.


The Cake

I absolutely loved this cake.  My sweet sister, Emily, makes Lucas' birthday cake every year.  I love to see what she comes up with.  For this Scooby Doo cake, she used a vintage Wilton cake pan from my grandmother's collection. You can easily find an affordable one on eBay.  The cake turned out great.


The Invitation

By far, my favorite part of planning any birthday party is the invitation.  Here is the recipe to make this awesome Scooby Doo invitation:
  • Customize this template in Microsoft Word or similar program with the details for your specific event and print.  You will need to also have installed the Scooby Doo font and Mongolian Baiti font.
  • Cut a coordinating pattern sheet of cardstock to 6" x 4 3/4"
  • Use a Cricut or similar cutting machine to cut a sold-colored layering scalloped square to 5 3/4" x 4 1/4"
  • Cut your invitation to 5 1/4" x 3 3/4"
  • Corner round the pattern piece and invitation
  • Use double-sided tape to adhere all pieces together (or glue)


Thanks for checking out my first Party Planning series post. 
 Look for more party inspiration coming soon!

Monday, August 29, 2016

Party Planning Series

Do you like parties?  I LOVE parties - planning them, throwing them, going to them.

I have always enjoyed getting creative with my parties and would like to share them with you!  I am hitting the archives and sharing with you some of my best party ideas and tips.

birthday candles


Look for Lukeyloo Create's new Party Planning series coming soon.  Some themes will include:

  • Mickey Mouse Birthday Party

  • Pirate Birthday Party 

  • 1990's Throwback Birthday Bash

  • Scooby Doo Birthday Party

  • Dinosaur Birthday Party

  • Invitation Templates

  • DIY Decor Tips

  • And MORE! 


Monday, August 15, 2016

Scrapbook Challenges Sizzlin' Summer 2016 Sketch 01

Sometimes the creativity just flows and everything comes together.  This was one of the those times.  The layout was inspiring. I found my paper right away - Close to My Heart Lolly Doodle paper pack. And the picture was more than just right -- it was perfect.  I had a ton of fun putting this layout together in less than 30 minutes.  Wow! Can barely believe it myself.  The more I get into scrapbooking, the less I care about perfection. It's all about recording memories and enjoying some relaxation time as I do it! 

My Scrapbook Layout:


 Scrapbook Challenge's Sizzlin' Summer 2016 Sketch 01 layout:


You can follow along with their Sizzlin' Summer 2016 Challenges by visiting them here.

DIY Hello Kitty Mermaid Dirt Cake

Three of my most favorite things combined this week for one awesome party: my sweet daughter Aubrey, Hello Kitty and dirt cake!  I made this cake her second birthday party and it was a huge success.


Here are some details on the cake:

- I used this recipe for the dirt cake. Although I opted for vanilla wafers instead of Golden Oreos. I should've went with the Oreos as I think the frosting would have added some sweetness and texture. I also double the recipe except only used 3 pudding boxes and one container of cool whip.

- The Hello Kitty was made using this Sizzix die from a friend.  I then used a circle punch and some creativity to turn her into a mermaid.

- I used a glass trifle dish instead of a bucket

- The palm tree was purchased from Party City

- I added a cute "happy birthday" banner from my Bella Blvd scrapbook stash

- The ice cream cone was an eraser I bought from Walmart

- The sunglasses were also purchased from Walmart in there doll section. So cute!

Another close-up:


Thursday, August 11, 2016

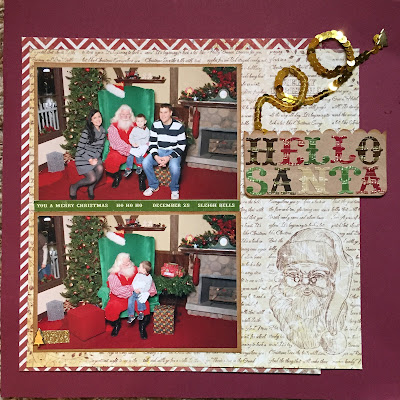
Scrapbook Challenges Sizzlin' Summer 2016 Sketch 05


I have a love/hate relationship with this page.  First, I loved the santa paper - so cute how it framed the page.  I also liked the overall color scheme and the pictures.  But I had a horrible time figuring out how to incorporate the loopy-loo's in the original sketch.  I still don't love the brassy color of the trim but, heh, that's ok.  Not every page needs to be my favorite.  Completing a layout in less than one hour with the two littles sleeping is always a win in my book!

My Scrapbook Layout:


 Scrapbook Challenge's Sizzlin' Summer 2016 Sketch 05

You can follow along with their Sizzlin' Summer 2016 Challenges by visiting them here.

Thursday, April 21, 2016

Liftapalooza 2016: Natalie & Lessons in Letters

Happy Days are here again!  I had time this morning to complete another one of Scrapbook Challenge's Liftapalooza sketches.  This time it was Natalie's sketch.

Here is her version:


What I loved most about her page was how simple and effortless it looked. It also made good use of patterned papers.  I came up with this fun version:


The hardest part was deciding on a great phrase. I used some cute Pink Paislee wood veneer letters.  Unfortunately there was only one letter of each in the package besides some commons ones like the "a" and "e".  I had to be creative with the words I chose so I had enough to finish.  On the bright side, choosing the right patterned papers was a breeze.  This part I typically struggle with.  Choosing the kite embellishments (impulse buy from Michael's) made finding the right card stock easier... something I'll need to remember in the future.

Until next time!

Friday, April 8, 2016

Liftapalooza 2016: Ali Scrapbook Challenge

I'm back in the saddle again.... the scrapbooking saddle that is!  With two under the age of two and a super-energetic boy who just turned 7, I have ZERO time to scrapbook.  This week I had a bad case of "create-a-page" itch and discovered Scrapbook Challenge's Liftapalooza post at just the right time.  I have been following them for a couple months now and was excited to try a challenge.

The first designer on their "Main Stage" was Ali.  This was her page:


Using Ali's inspiration, I created this page:


Is this my best work?  I hope not!  Is it the best I can do right now with my current life demands?  You bet.  I am hoping to keep up with all the fun at Liftapalooza!